My calendar- (from the top) string lights (from Target), fishbowl numbers, months of the year (from calendar math kit), ordinal numbers chart, counting by 10s to 100 gummy bear chart, cupcake birthdays, calendar (calendar math kit),
yellow chart- blends, word families, place value, estimation jar, beginning sound and shape
Getting to Know Numbers 1-30- white poster with green bordered pieces,
clip collection- I put a strip of magnet on the bulletin board paper and put magnets on the back of the numbers then the numbers get moved to the We have been in school _ _ _ days chart (on the white board) to show the correct number.
Below the white board is our straw collection, next is a hundreds chart and finally All About Today (the chart came from Lakeshore Learning 10 years ago). Now they have one a little different- New All About Today with cards. I like the cards for the simple fact that you can print up new years when you need them, but I am concerned that the cards will not last as long as the pillows have- 10 years and counting! Because I didn't have 2015 from Lakeshore I ended up buying another calendar with pillows to get myself to 2025.
Here is my word wall. On the counter you can see my listening centers (MP3 players and 2 books in each basket). You can also see the book bins that were in much need of being replaced. I found the navy blue sturdy ones at IKEA for $0.50 a piece about 4 years ago. They had been used even since then. Finally many of them were starting to fall apart this past year so i supplemented with white paper bins. (Those fell apart real fast!) This year I plan to splurge and get the set from Really Good Stuff (hopefully I can make them last a while). Has anyone used these or have a suggestion for another company? Also if you use plastic book bins, how do you put student names on them?
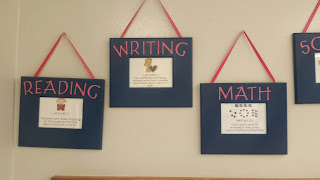
Objectives- My thought was if I could make them look really nice I would remember to change them on a weekly basis. Don't ask me how that worked for me. They still look nice though.
To make your own- To put these together I found some plastic frames at Michael's, used a Cricut cutter to punch out the letters and then rubber cemented the letters to the frames. (You can just as easily, or maybe more easily use letter stickers to do this.) On the back of the frames I attached two command hooks, tied loops at the two ends of a piece of ribbon and put the loops on the hooks. If you happen to want these objective cards you can find them in my TPT store.
CHAMPs display- The letters are from the teachers store, just your normal 4" punch out letters. I put the expectations up with magnets on the white board so they are easy to change out. I find this super helpful in the beginning of the year in teaching expectations; but generally phase it out when they know what I expect. This past year I had a student who kept reminding me, "shouldn't that say whisper voices because we are working at our tables with or friends." Which my response would be, "Good point, let me change that now." (In my head however it was "I cant wait for you to get tall enough to change this without me wasting teaching time...") I guess I don't have much room to complain, she knew the expectations well enough to remind me of them. :) Want these cards- you can find them here for FREE!
Here are my student self-assessment rubrics- based on Marzano's levels of understanding. The students got pretty good at using these. It was a really great tool when I was getting ready to pull a small group or seeing dazed looks on their faces. I would ask them to rate their level of understanding by holding up fingers. I even used this to put kids together into center pairs/groups. "Okay it seems I have 5 kids who say they are level 4s, here's who they are. If I have not called you to a small group with me you need to make sure you are in a group with one of those students; 3 students max per group." I generally would take the 1s and 2s in my small group first and let some of the 2s and 3s try to get a better understanding from their classmates.
Here is my writing center. The Rhyme Time Concentration by Stay and Play (used on the rhyming anchor chart) is a set that can be found here for FREE! Even in March I had students having trouble with rhyming. So we made this anchor chart by playing a rhyming and reading game. I printed this set onto different colored paper, cut the word off of each picture and spread the words out on the tables. I gave each student a picture to start with and they walked around the room looking for the word to match. When they found the match they brought the word and the picture to me and I taped them together. We did this until all the pictures and words were matched. Each child got 1-2 cards (with the pictures and words). They we started making this anchor chart, "Johnny has star, who has something that rhymes with star?" I glued the cards next to one another on the anchor chart and then displayed it at the writing center for reference.
Punctuation Paradise, short vowels, and blend posters are all from the Dollar Tree. The smaller alphabet poster and exemplar writing piece are from The Writing Center Starter Kit by A Cupcake for the Teacher. There are LOTS of resources in this kit! On the counter are the student writing portfolios (scrapbook paper pouches to fit writing paper and construction paper bigger than 8.5x11). In the pocket chart is a set of writing picture prompts and vocabulary cards to go with it. Sadly I cannot remember who published the set. Finally there is a drawer set that holds different types of paper. The chairs at the center face the word wall.
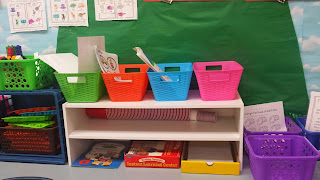
Here are my grab and go centers.
On the top and bottom of the white shelf are literacy centers. The middle shelf contains cups for making cup towers (best and cheapest building center ever!)
These here are my math centers. They are all grab and go. There are a variety of levels and skills out at any given time.
One of my favorite poster sets- Reading Reminders. I love everything about this, the simplicity of the wording, the size of the items (perfect for a display behind my reading table). Different reading groups can have a different focus without me having to do much changing to the display.
My pride and joy- the classroom library. I put some cheap book shelves on the counter behind the white book shelves. I got some fabric at JoAnn's, folded the edges back (didn't bother sewing) and used flat push pins to tack the curtain to the top of the book shelf. The purple curtains hide all the books for different topics that are not out at the moment. I do have a LOT of books.
The books are organized in ziploc bags by topic. Making it super easy to change books out efficiently.
So there it is... a tour of last year's classroom. This coming year I am moving schools and I will be starting from scratch with room decorating. I think I am going to be more deliberate with the neon colors and try to keep my room less cluttered.
I would love to see your classroom design plans for next year. Leave me a link below to your design inspiration- blog, pinterest or whatever.
http://kindergarten-kerry.blogspot.com/2015/07/christmas-in-july-tpt-sale-july-13-14.html


notify me
ReplyDelete